
What Is Photographic Noise: Causes, Types, and How to Remove It
 RoboNeo TeamAugust 24, 2026
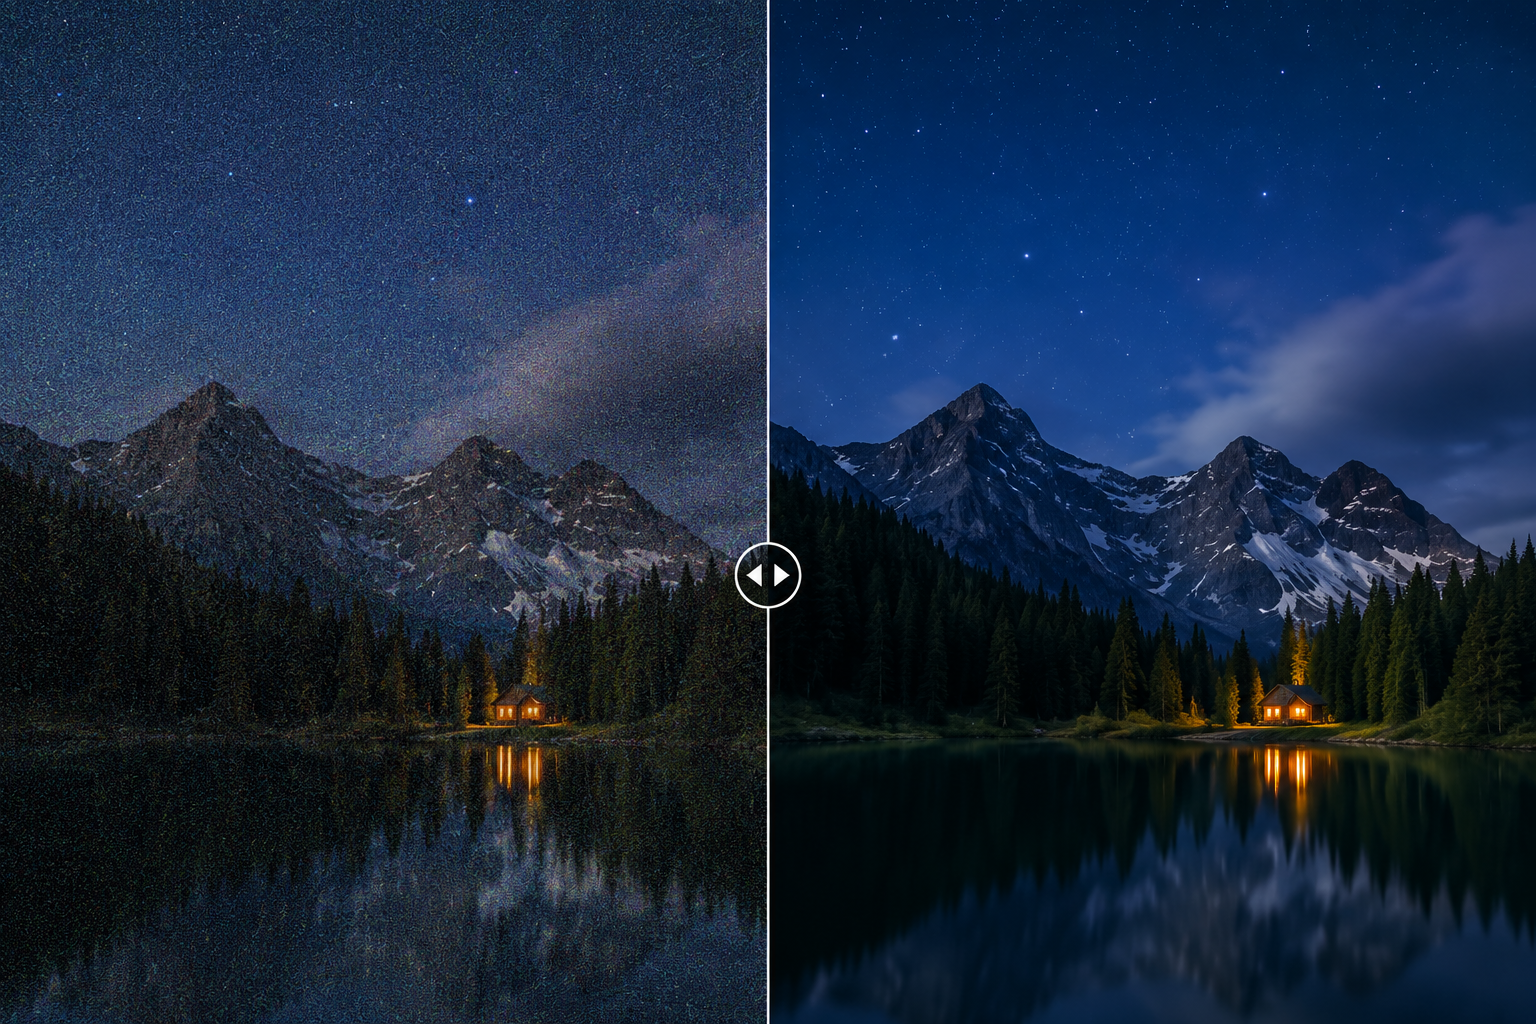 Photographic noise is the random variation in brightness or color that can make a digital photo look speckled, rough, or uneven. It often becomes visible when shooting in low light, using a high ISO, or brightening dark areas during editing.
This guide explains how to recognize photographic noise, what causes it, how it differs from blur and pixelation, and how to reduce it without destroying natural detail.
How Photographic Noise Appears in a Photo
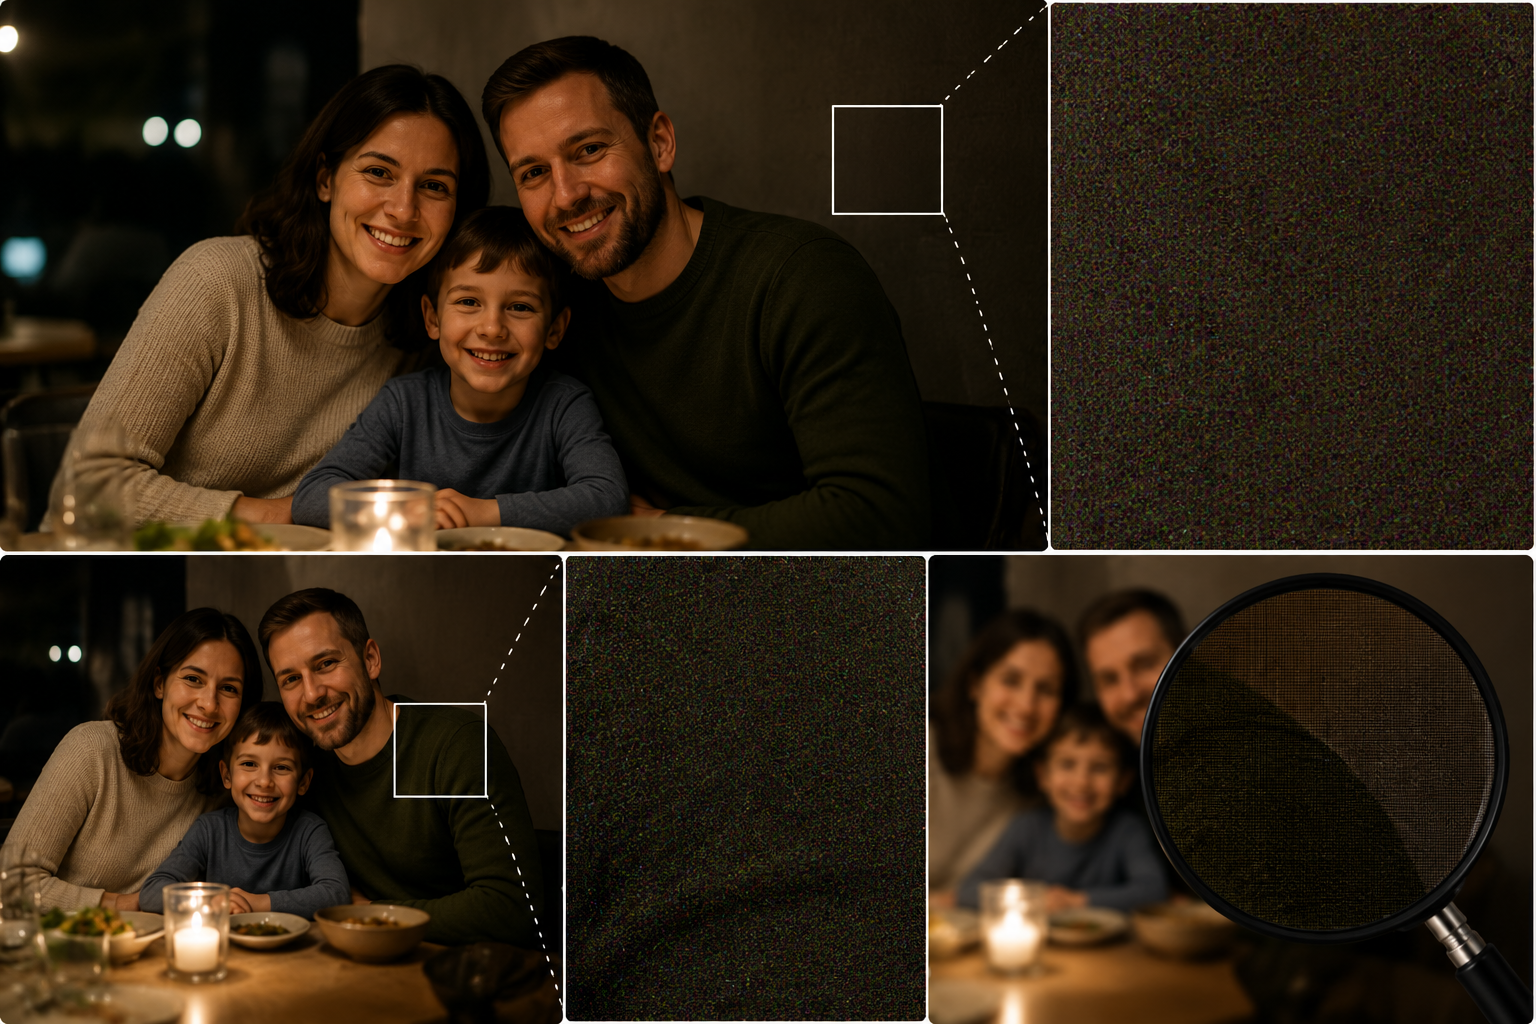
Noise is easiest to see in shadows, night skies, dim indoor scenes, and areas with smooth color. When you enlarge the image, a surface that should look even may contain random light and dark grains or scattered red, green, and blue spots.
A family photo taken in a dim restaurant might look acceptable on a phone screen. At full size, however, the dark wall behind the subjects may appear rough, while their clothing contains colored speckles that were not present in the scene.
Photographic noise does not always mean that a photo lacks sharpness. An image can have clearly defined edges and still contain heavy noise. Another image may look clean but remain blurry because the camera moved or focused on the wrong subject.
To identify the problem, inspect the photo at close to 100% magnification. Pay particular attention to shadows and areas of uniform color instead of judging the image only from a thumbnail. This closer view also helps you evaluate how much detail is lost as noise reduction increases.
The Main Types of Noise You Can See
Although digital images may contain several technical forms of noise, photographers usually encounter two visible types.
Luminance Noise
Luminance noise consists of random brightness variations. It resembles fine black-and-white grain and often makes shadows, walls, skin, or skies appear rough.
A small amount of luminance noise may not seriously affect a photo, especially when the image will only be viewed at a normal size. Removing too much can be more distracting than leaving a subtle texture. Skin may become waxy, grass can lose its individual blades, and hair may turn into a smooth mass.
Color or Chroma Noise
Color noise, also known as chroma noise, appears as colored spots, pixels, or patches that do not belong to the original scene. Red, green, blue, and purple speckles are particularly noticeable in dark areas.
This type of noise often causes more obvious color damage than luminance noise. Editing programs therefore commonly provide separate controls for color and luminance noise reduction. Color noise can usually be reduced first because unwanted color speckles rarely contribute useful texture.
What Causes Noise in Digital Photos?
When people ask, "what is a noise camera," they usually mean what camera noise is and why it appears. The camera itself is not necessarily faulty. Noise develops when random variations in the recorded signal become visible compared with the useful image information.
Limited light is one of the most important factors. When the sensor receives less usable light, the ratio between the true image signal and random variation becomes weaker. Similar low-light noise and image quality problems can also appear in phone footage recorded in homes, cafés, stores, and other uncontrolled environments.
Several shooting and editing conditions can make photographic noise more noticeable:
Low light and underexposure: Dark scenes provide less usable image information. A portrait taken beside a poorly lit window may contain deep shadows that reveal noise when brightened later.
High ISO: Raising the ISO helps photographers use a faster shutter speed or obtain a brighter image, but it can also make existing signal variation more visible. A high ISO is often necessary at a concert or an indoor sports event, where avoiding motion blur may matter more than producing perfectly smooth shadows.
Long exposures and sensor heat: Keeping the sensor active for an extended period can introduce hot pixels, fixed patterns, and other artifacts. These issues often appear in night landscapes, star photography, and long-exposure city scenes.
Heavy shadow recovery: Increasing the brightness of severely underexposed areas also amplifies their imperfections. A foreground that looks almost black in the original file may reveal strong color noise after the Shadows or Exposure control is raised.
High ISO is therefore not the only source of photographic noise. Available light, exposure, sensor performance, temperature, and editing decisions all influence the final result.
Photographic Noise vs. Grain, Blur, and Pixelation
Choosing the correct repair method starts with identifying the actual problem. Denoising cannot restore missed focus, and sharpening cannot reliably remove colored speckles.
| Issue | What It Looks Like | Typical Cause | Where It Appears | Can Denoise Help? | Best Fix |
| Photographic noise | Random brightness grains or colored spots | Low light, high ISO, long exposure, or shadow recovery | Shadows, skies, walls, and smooth colors | Yes | Noise reduction or AI enhancement |
| Film grain | Organic, textured pattern across the image | Film emulsion or an added creative effect | Usually distributed throughout the frame | Sometimes, but removal may change the intended look | Keep it for style or reduce it gently |
| Blur | Soft edges and missing definition | Missed focus, subject movement, or camera shake | Subjects, edges, or the entire frame | Usually not | Sharpening, deblurring, or reshooting |
| Pixelation | Visible square pixels or blocky edges | Low resolution or heavy compression | Enlarged images and compressed files | No | Upscaling or a better source file |
| Compression artifacts | Blocks, ringing, or smeared details | Strong JPEG compression or repeated exporting | Fine details and high-contrast edges | Only slightly | Use a higher-quality original or export setting |
If low resolution is the main issue, the image needs enlargement rather than stronger denoising. Understanding how to make an image high resolution can help you choose between traditional resizing, AI upscaling, and restoration.
Upscaling increases the output dimensions, but it does not guarantee that every missing texture will return. The same limitation applies when considering what 4K upscaling changes: a larger file can still contain noise, blur, or compression artifacts from the original source.
How to Remove Noise From an Existing Photo
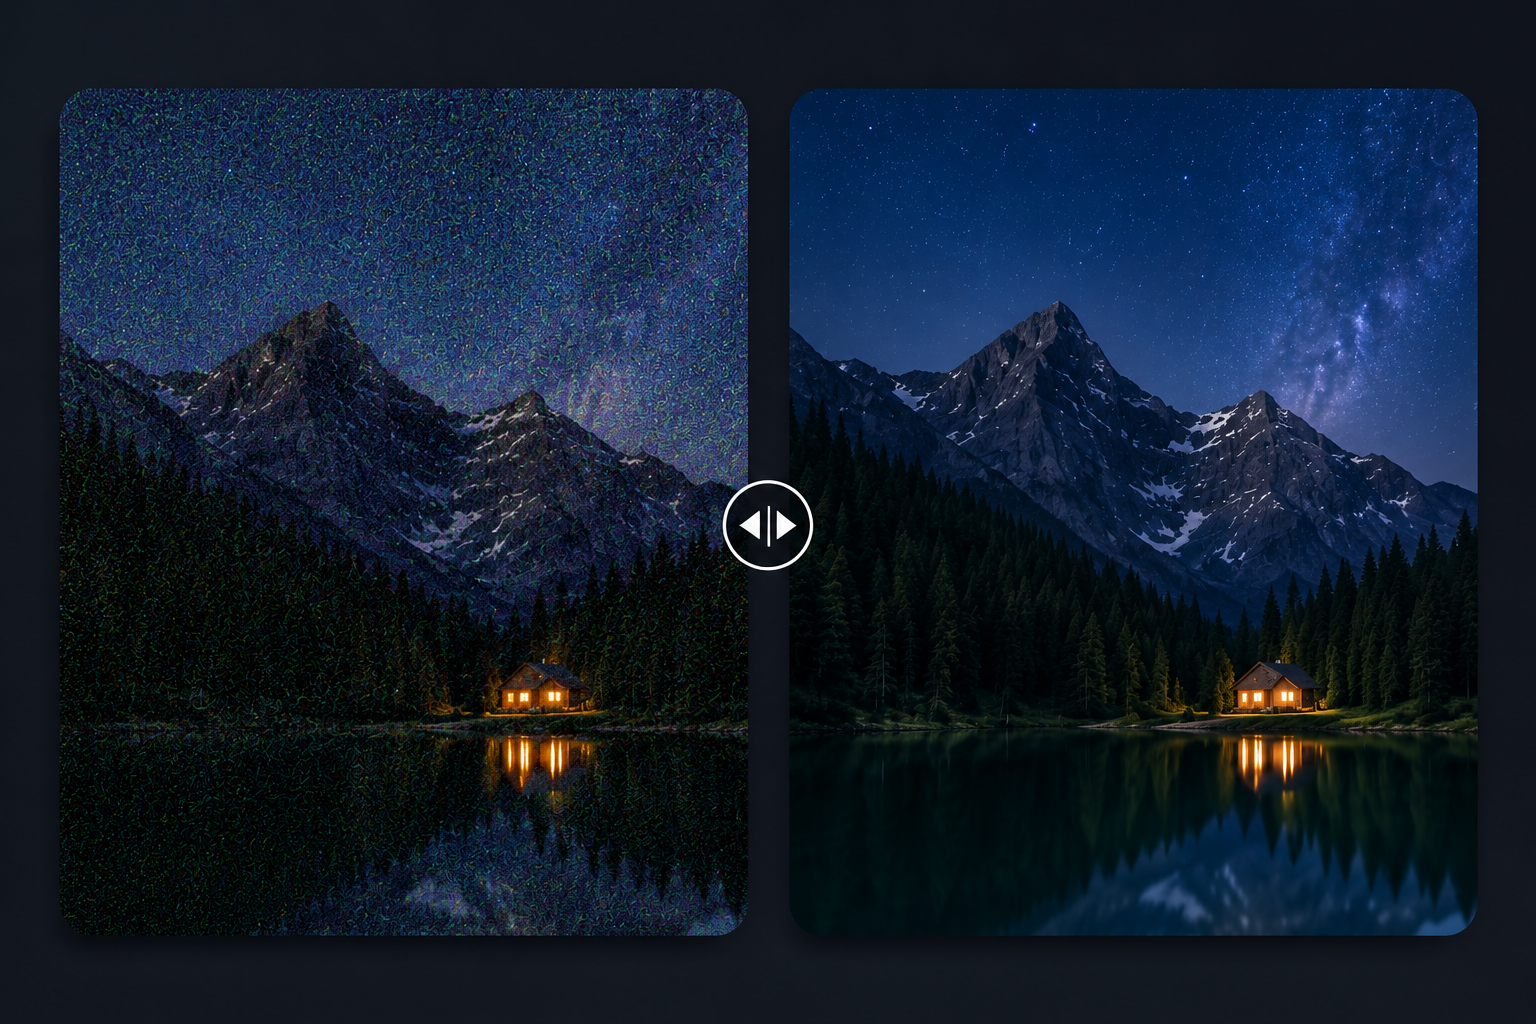
Successful noise reduction makes distracting artifacts less visible while preserving believable texture. The goal is not to turn every shadow into a perfectly smooth surface.
Use Standard Noise Reduction Controls
Most photo editors separate luminance and color noise controls. Begin with the color adjustment and increase it until the unwanted colored speckles become less distracting. Then apply luminance reduction gradually.
Rather than watching only the darkest part of the frame, examine areas that contain real detail:
Hair, eyelashes, and facial features
Fabric, leaves, grass, and printed text
Fine lines around buildings and product edges
A nighttime portrait may look cleaner after strong luminance reduction, yet the subject's hair can lose its individual strands. Reducing the setting slightly often produces a more natural result, even if a little texture remains in the background.
Noise reduction and sharpening also need to be balanced. Denoising smooths small variations, while sharpening strengthens local contrast around edges. Applying both too aggressively can create crunchy outlines, artificial skin, and renewed emphasis on the remaining noise.
Photos affected by several problems at once, such as noise, blur, fading, and low resolution, may benefit from a broader AI photo restoration tool rather than separate adjustments for every defect.
Use AI-Assisted Enhancement for Noisy Photos
AI-assisted enhancement provides another option when manually balancing several controls feels time-consuming. These tools analyze image content and attempt to distinguish unwanted noise from meaningful features.
You can process the photo with RoboNeo AI Enhancer and compare the result with the original. Do not judge the output only by whether the background looks smoother. Check whether faces, text, small textures, and object edges still appear natural.
A photo of a pet taken indoors may contain noise across both the wall and the animal's fur. A useful enhancement should clean the flat wall while retaining enough individual strands to keep the fur believable.
Check Detail Before Exporting
Once the adjustment is complete, inspect important areas at a high zoom level. Then return to the image's normal viewing size to evaluate the overall appearance. Some noise visible at 100% may disappear completely when the photo is displayed online or printed at a modest size.
Watch for warning signs such as waxy skin, smeared hair, color bleeding, overly smooth backgrounds, and bright artificial outlines. Their appearance usually means the correction has exceeded what the source image can tolerate.
Export settings also matter. Saving a heavily compressed JPEG can introduce new artifacts even after the original noise has been reduced. Keep a high-quality edited copy before producing smaller versions for websites or social media.
FAQ
What does denoise do to a photo
Denoise reduces random brightness grains and colored spots, making shadows and smooth areas appear cleaner. Strong processing can also remove fine textures, so the best result maintains a balance between noise reduction and detail preservation.
Is photographic noise the same as film grain?
Not completely. Digital noise results from random variations during image capture and processing, while traditional film grain comes from the physical structure of film emulsion. They can look similar, and grain may also be added to a digital photo as a creative effect.
Does high ISO always cause noisy photos?
A higher ISO often makes noise more noticeable, but the ISO value alone does not determine the result. Available light, exposure, sensor design, and later shadow adjustments also affect noise. Two cameras used at the same ISO may therefore produce noticeably different images.
Why is my photo noisy even at ISO 100?
A low ISO does not guarantee a noise-free photo. Severe underexposure, heavy shadow recovery, long exposures, sensor heat, and insufficient light can all reveal noise in an ISO 100 image.
Can photographic noise be completely removed?
Software can substantially reduce visible noise, but removing every trace without affecting genuine detail is rarely possible. Excessive denoising may erase skin texture, hair, fabric, and other fine features. A cleaner but still natural-looking photograph is usually a better target than an entirely smooth image.
You May Be Interested

New from RoboNeo: Agent Team. The AI That Hired You a Whole Creative Squad

Best App to Remove Tiktok Watermark in 2026

Best Free AI Video Generator: Top Tools to Try

Best AI Tools to Fix Blurry Videos in 2026

Best YouTube Script Generator: From Script Writing to Video Creation